Client Dash
Documentation
If you are upgrading to Client Dash 2.0 from a previous version, please read the upgrade notes.
The Customize Admin Tool
Client Dash comes with a powerful tool for customizing the admin experience for your users and clients. You can present your users with a tailored experience of the administrative portion of your website by removing, moving, modifying, or adding both menu items and dashboard widgets. We will cover this later.
Note: By “admin experience”, we mean how your users experience the “back end”, or “administrative portion” of your website. In other words, what your users see when they log into your website and visit /wp-admin/.
To open the Customize Admin Tool, simply click “Client Dash” in the admin menu, or click the Client Dash -> Customize Admin link in the submenu.
The Customize Admin Tool is separated into two main components on the screen.
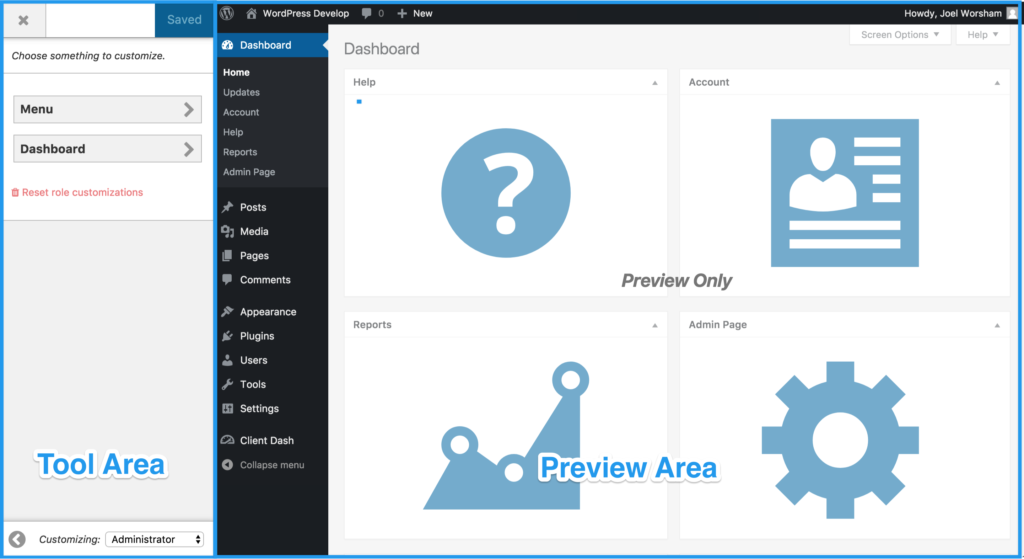
Tool Area
On the left side of the screen is the tool area. This contains all tools used to customize the admin experience.
Preview Area
On the right side of the screen is the preview area. This is where you can see a live preview of your customizations. This is only a preview and your changes will not be viewable to anyone else until you click “Save”.
Roles
The most important thing to understand about how this tool works is that you are customizing the experience for each role individually. This means you can customize how an Editor will view your website, and then separately customize how a Contributor or Administrator will view your website. You may want to hide some menu items for an Editor, but then leave them for an Author. Or you may want to rename a dashboard widget for your Contributor, but leave it for an Administrator.
Note: To learn more about WordPress Roles, and how they work, visit this page.
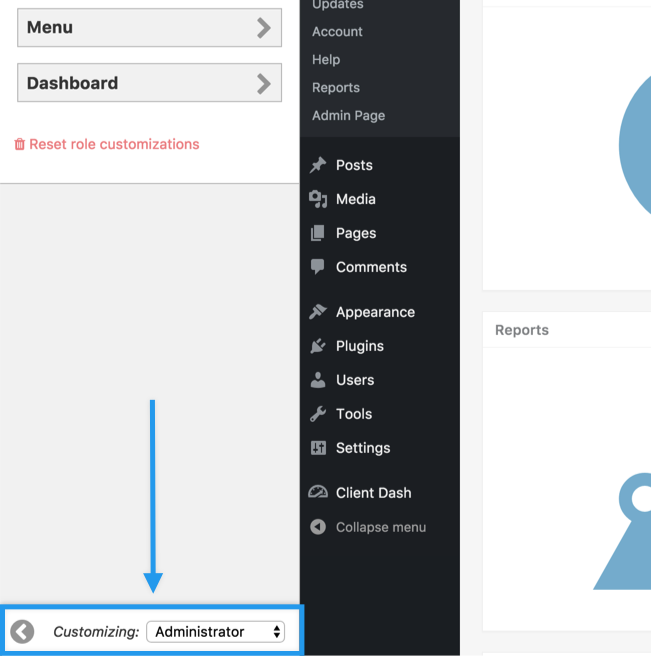
When you open the Customize Admin Tool, you will be editing the experience for site Administrators by default. To change which role you are customizing, use the “role switcher” at the bottom of the Tool Area. Once you switch to a new role, all changes you make will apply only to that role. You can edit the experience for as many or few roles as you need.
Menus
The “administrative menu” refers to the menu a user sees on the left side of the screen when logged into your website. Each role, by default, already has a unique menu for them. Client Dash allows you to customize them even further.
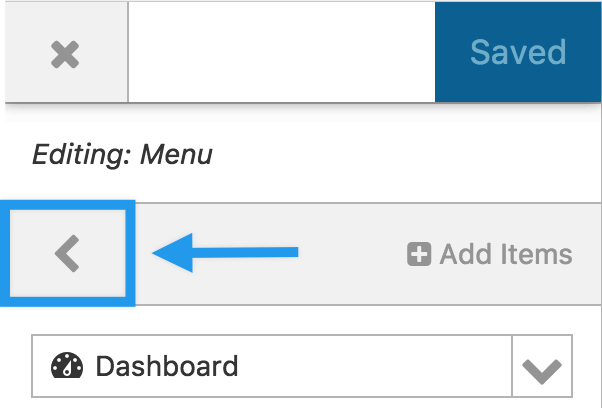
In order to edit a role’s administrative menu, simply click on “Menu” in the tool area. You will then see a customizable admin menu in the tool area for that role.
Note: You can go back anytime by clicking the back arrow in the tool area.
Re-Ordering Menu Items
You can re-order the menu items by dragging and dropping them. Click and hold over any menu item, drag the item to the desired location, then release the mouse to place the item in the new location.
Editing Menu Items
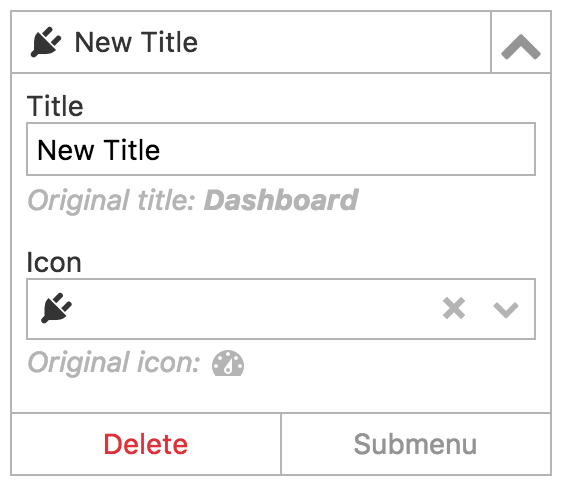
In order to edit a menu item, click the downward facing arrow on the right side of a menu item. This brings up a new area under the menu item where you can edit the menu item. You can modify the text of the menu item (or “Title”) and also modify the icon that shows to the left of the menu item.
Deleting Menu Items
Any menu item can be deleted so it does not appear in the user’s admin menu. To do so, begin editing the menu item by clicking the downward area (as explained above) and then click “Delete”. The item will be removed from the admin menu. This item can be added back to the menu at any time; this will be explained below.
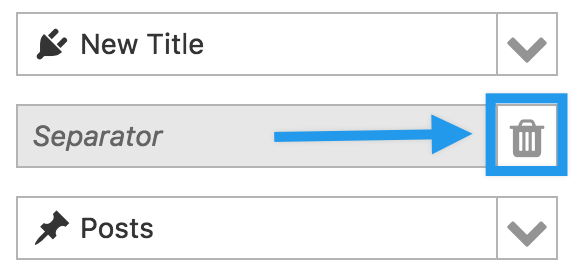
Note: Some menu items deleted by simply clicking the trash can icon on the right side of the menu item, where the down arrow would normally be. Menu separators are an example of this.
Adding Menu Items
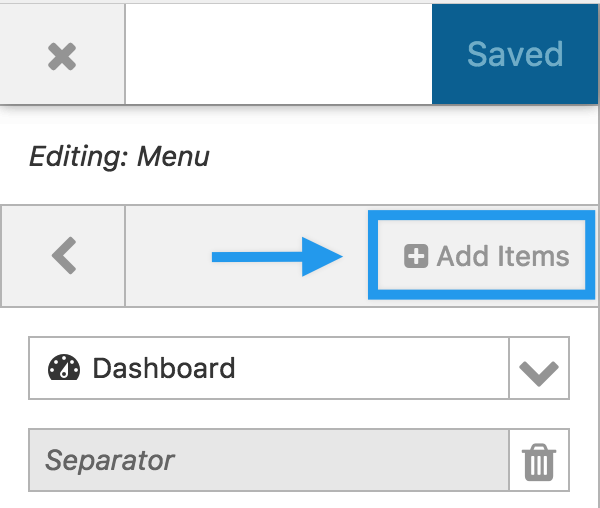
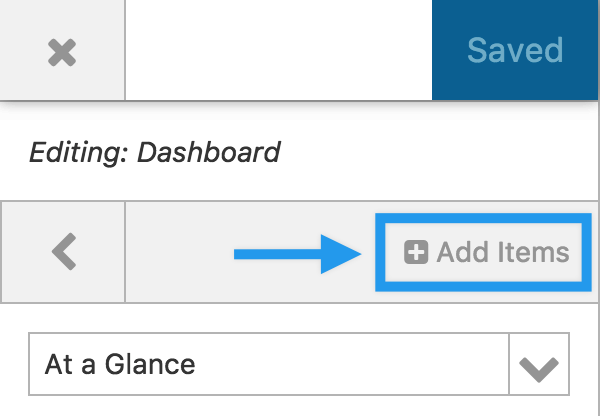
Any menu items you delete will now appear in the “Add Items” tool area screen. To access this screen, click the “Add Items” button above the admin menu editor. You will then see a list of items you can add. Any items you deleted will appear here.
There can also be re-usable menu items you can add from here including Separator and Custom Link. You can add as many of these as you like. Separators add space between menu items in the admin menu and the Custom Link may contain any link you enter when editing the menu item.
Modifying Submenus
Some menu items have submenus that are visible either when hovering over the menu item in the admin menu, or when visiting the page itself. You can edit these submenus. In order to do so, click the down arrow to edit the menu item, as explained above, and then click the “Submenu” button.
This will take you to an editor for the submenu, which will look and function identically to the menu editor. From here, interact with the submenu exactly as you would with the top-level menu. Note that these items do not have icons, as submenu items do not have icons.
Dashboard Widgets
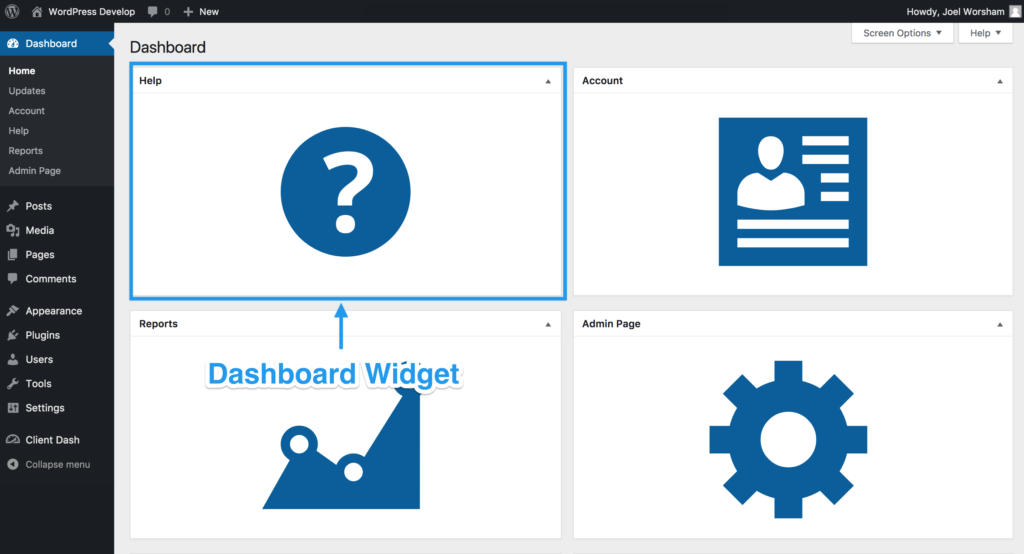
“Dashboard widgets” refer to the “boxes” or “widgets” that appear on the administrative dashboard. The “administrative dashboard” is the page you are taken to immediately after logging into the website or when clicking “Dashboard” in the admin menu.
Each of these widgets can be further modified, removed, and new widgets can be added for each role. To open the Dashboard editor, click the “Dashboard” button in the tool area.
Note: You can go back anytime by clicking the back arrow in the tool area.
Modifying Widgets
You can edit each dashboard widget. For widgets added by WordPress and other plugins, you can only edit the title. To do so, click the down arrow to the right of the widget title in the list. Some widgets may offer more customization tools.
Note: There may be add-ons available to Client Dash that allow further customization of the widgets.
Deleting Widgets
Any widget can be deleted so it does not appear in the user’s dashboard. To do so, begin editing the dashboard by clicking the downward area (as explained above) and then click “Delete”. The item will be removed from the dashboard. This item can be added back to the dashboard at any time; this will be explained below.
Adding Widgets
Any widgets you delete will now appear in the “Add Items” tool area screen. To access this screen, click the “Add Items” button above the dashboard widgets editor. You will then see a list of widgets you can add. Any widgets you deleted will appear here.
There can also be re-usable widgets you can add from here including the Text Widget. You can add as many of these as you like. The Text Widget allows custom text or HTML to be displayed in the widget.
Note on the Customize Admin Tool Tutorial
When you first use this tool, you will be presented with a quick tutorial on how to use it. Once you finish the tutorial, or if you close it, you can always view the tutorial again by visiting Client Dash -> Settings and clicking the “Enable” button next to “Enable Customize Admin Tutorial”.
Helper Pages
Client Dash Helper Pages are a few extra administrative pages that are added to your website. Each page contains some useful information for the user. By default, they are viewable to a few pre-defined roles. For example, there is an Account page that is viewable for almost every role. There is also a “Reports” page only viewable to Editors and Authors. This can be customized, which we will cover later.
The Helper Pages
Account
Reports
Provides information about the current website and setup.
Help
Provides quick reports on the website’s content.
Admin Page
Customizable admin page to benefit your users. Note that this page is unique in that you can fully customize the content.
Customize Helper Pages
There are a few customization tools available for each Helper Page. In order to customize them, visit the “Helper Pages” screen under Client Dash -> Helper Pages.
Here you can customize a few different things for each page. You may also notice there are some items underneath each page. These represent tabs for each page. This means you have even more granular control of what your users see. You can modify or hide individual tabs within helper pages.
Helper Page Title
You are given the ability to customize each page and tab title. This is what will appear in the admin menu, dashboard widgets, and on the pages themselves.
Helper Page Icon
Each page, but not each tab, has a customizable icon. By clicking on the icon to the left of the title, you are presented with a tooltip of icons that you can click. These icons are used both on the pages themselves and in each dashboard icon.
Helper Page Roles
Each helper page should be viewable to only specific roles. Some of the information in each page is sensitive information that you may want an Editor to see, but not a Contributor. By default, we have customized each helper page to be viewable to roles that we find is best, but you are empowered to modify this if you wish. By removing all roles from a page’s tabs means it will be viewable to no one and effectively be disabled.
To modify the roles that can view a helper page, simply click on the “Select Roles” button next to each tab. You will then see a tooltip containing a list of roles. You can click on a role to enable or disable it. If a role cannot view any of the helper page’s tabs, the page itself will not be visible to the user.
Admin Page
The Client Dash Admin Page is a powerful tool that allows you to create a hand-tailored, customized page for your users to see. You can add any content to the page you like and customize who can and can not see it.
Customizing the Admin Page
In order to customize your admin page, visit the Client Dash -> Admin Page screen.
From here you can customize the content of the admin page. You customize this just like you would any other page. You can add as much content as you like, including media and some shortcodes.
In order to customize the admin page title and icon, visit the Helper Pages screen.
Upgrading to version 2.0
If you are upgrading Client Dash from a previous version to 2.0, please read the following.
Version 2.0 of Client Dash is a major release and presents an entirely new experience for Client Dash. There is an upgrade tool built into Client Dash so that you can, as seamlessly as is possible, migrate your current Client Dash settings into 2.0. This tool will migrate your custom menus, dashboard widget settings, helper page settings, and webmaster page (now called “admin page”).
After installing version 2.0 of Client Dash, you should see a notice at the top of the screen telling you to upgrade the plugin. You are given the option of migrating your previous settings, as mentioned above, or not migrating your settings and start over. Click one or the other in order to complete the upgrade and activate Client Dash 2.0. The plugin will not function until you do this.
Migrating Menus
The upgrade process will attempt to migrate your customized admin menus into the new Customize Admin tool introduced in version 2.0. It should be identical to your current customized menus, with a few exceptions.
In previous versions of Client Dash, you were allowed to add submenu items as top-level menu items. You were also allowed to move submenu items into other submenus. This is no longer possible in version 2.0. The ability to do this in previous versions caused a lot of problems and has been deemed inappropriate for WordPress going forward. We apologize if this causes any inconveniences, but we believe it is for the best.
Any submenu items you have moved to another submenu will be gone. Any submenu items you have as top-level items will be highlighted in red and declared “missing”. You will need to delete these.
Migrating Dashboard Widgets
The upgrade process will attempt to migrate your dashboard widget settings into the new Customize Admin tool introduced in version 2.0. All settings should be preserved, which should only be widget titles and deleted widgets.
The one thing to note is that in previous versions of Client Dash, you could not customize the dashboard widgets individually for each role. Any changes you made would apply to all roles. In Client Dash 2.0, you can customize the dashboard widgets for each role. This means that the upgrade process will apply your settings to all roles invidually. In order to make changes to each role, you will need to customize each role individually or reset each role individually, from the Customize Admin tool.
Webmaster Page
In previous versions of Client Dash, there was a customizable “Webmaster Page”. This still exists in 2.0, but is now called “Admin Page”. Your settings for this page will all be migrated. This includes the icon, page title, tab title, page content, and feed settings. In order to edit this page, you will now need to refer to the documentation for “Admin Page”.
Changelog
2.2.0
- If Client Dash is being activated for the first time, the database upgrade now runs automatically to prevent confusion. Previously manually running the database upgrade process was required before the plugin could function.
- Fixes an incompatibility with LearnDash.
- Fixes an issue with Custom Links that don’t have a link properly set yet.
2.1.6
- Fixes an issue where if another plugin/theme prevented Client Dash’s customizer from loading a response it would cause the customizer to crash in some cases
- Prevents WishList Member from breaking the Customizer
- If a User Role does not have the
readcapability, it will now not show within the Role selector - Fixes some potential PHP errors
- Bumps the “Tested To” value
2.1.5
- Adjust a potential issue with the links that show below Client Dash in the plugins list
- Fixes a bug when a Title isn’t defined for a Dashboard Widget
- Fixes a conflict with Smart Slider 3 and possibly other plugins where iFrames in the admin may have been resized when they should not have been.
2.1.4
- Added a Delete Button for “Missing” Menu Items in the Customizer
- An item normally goes “Missing” if you customize a Role’s Menu and then deactivate the plugin that had originally added that Menu Item.
- However, in Client Dash v2.1.1 and v2.1.2 it was sometimes possible to save Menu Items to a Role that the Role could not actually access. When updating to v2.1.3 or later it would cause these Menu Items to be “Missing”.
- By adding a Delete Button for these Menu Items it makes it easier to remove them without having to Reset all Menu Customizations for the Role. If the Menu Items were added by the glitch in Client Dash v2.1.1 and v2.1.2 that would be the only other way to remove them.
2.1.3
- Fix: Reverts priority change in 2.1.1
- Fix: Properly implements support for bbPress menu items. This is done by grabbing the capabilities from bbPress for each of their Forum Roles and mapping them to the Roles seen in the Client Dash Menu Customizer. See
bbp_get_user_role_map()in bbPress.- Since Client Dash only allows editing the Menu for a Role and not for a User, this means that if a User were to have a combination of Roles like Subscriber and bbPress Keymaster and the Subscriber Role’s Menu was customized for all Subscriber Users, the extra bbPress menu items would not show for them.
2.1.2
- Fix: Fixes issues with loading resources on Windows Servers
- Fix: Translation file was including references to development-only files. These references have been removed.
2.1.1
- Fix: bbPress Menu Items now show properly in the Menu Customizer
- This also should fix problems with other plugins that were loading after Client Dash was and therefore not allowing Client Dash to see their Menu Items
- Fix: Prevents PHP Errors when using the Menu Customizer with BuddyPress active
- Added a
client_dash_loadedAction Hook to easily run code only after Client Dash has fully loaded
2.1.0
- Fix: Bumping to a minor version to ensure that anyone who may have updated to v2.0.1110 will continue to recieve updates properly
- You can now use
<span>and<i>tags with Class Names and<iframe>tags within the Text/HTML Dashboard Widget - Auto-Embeds (such as YouTube videos) now work by just pasting in the URL
2.0.12
- Fix: Build script messed up the version number
2.0.11
- Fix: Incompatibility with a User’s Role not being stored at the 0 Index
- Fix: Potential PHP Errors in the Client Dash Customizer when no customizations to Submenus were made
2.0.10
- Fix: Potential crash with invalid Role IDs from third party plugins.
2.0.9
- Fix: Unable to hide customize admin tutorial.
2.0.8
- Sometimes Rest URL doesn’t load properly in Customize Admin Tool.
2.0.7
- Ensure Client Dash Customize Tool is accessible.
2.0.6
- Get Client Dash Customize URL properly in case of sub-directory installs.
2.0.5
- Fix bug with customized Dashboard Widgets not showing in Customize tool.
2.0.4
- Fix new Dashboard Widgets not showing in Customize tool.
- Fix loading icon display.
2.0.3
- Bug fix forCustomize Admin Tool role switcher select box invisible with long role names.
2.0.2
- Fix plugin installation bug.
2.0.1
- Bug fix for CD Pro not updating to 1.1
2.0.0
- First major revision of Client Dash. Includes many features
- Client Dash Customize Admin Tool
- Helper Pages rework
- Settings page rework
- Addons page rework
- Webmaster page is now Admin Page and completely reworked
1.6.20
- Bug fix for separators in admin menu not showing properly.
1.6.19
- Bug fix for an invalid admin notice.
1.6.18
- Bug fix for not showing proper Plugin sub-menu items in the menu customizer.
1.6.17
- Bug fix for potential conflict with plugin “If Menu”
1.6.16
- Bug fix with menus and some plugins/themes conflicting
1.6.15
- Bug fix with Tools page
1.6.14
- Make everything translatable
1.6.13
- Add settings sidebar.
1.6.12
- Fix potential menu editing bug.
1.6.11
- Fix potential admin theme PHP notice.
- Fix potential fatal error due to improper static method call.
1.6.10
- Fix issue with non-public post type menu items not showing in menu editor even when “show_in_menu” is true.
1.6.9
- Fixed potential fatal error.
1.6.8
- Fixed potential fatal errors when using dashboard widgets.
- Fix CD core widgets not working
1.6.7
- Very minor bug fixes.
- Testing in the WordPress 4.1 environment.
1.6.6
- Allowed the Links menu item to be available in Client Dash only when the link manager functionality is enabled.
- Fixed edge-case fatal error due to some inconsistency in the code.
1.6.5
- Made jQuery live for the icon-selector dropdown in CD Settings -> Menus so that it would also work for newly added menu items.
- Made sure the filter that removes CD admin menu nav menus from WP Core lists applies everywhere (they were showing in the customizer in the custom menu widget).
- Menus generated for administrators weren’t getting all items, due to custom capabilities. Now if you have “manage_options” (typically only admins) you get all menu items.
- Changed how the new admin menu was added in order to gain more control over order, which fixed the sub-menu being out of order bug.
- Changed the code to tell which page is the current page to be a little more specific.
- Menu items in CD Settings -> Menus now display not just live icons, but images and svg as well. (svg is a bit buggy still though).
1.6.4
- Default dashboard widgets for CD Core had “Client Dash” in them. Removed that.
- Made link visibility in Reports -> Site dependent on user capabilities.
- Fixed “Plugins 0” on menus page to be “Plugins”.
1.6.3
- Dashboard sidebar widgets erased after messing with core widget area
- Add nag on icons page if under wp 3.9 because not all icons will show
- Syntax error on PHP 5.3 and previous
- Network activated or activated on main site of multi-site causes CD styles to exist on network admin dashboard
- Dashboard widget CD Core items visibility not dynamic on initial install
- Webmaster widget custom title modifications no longer allowed from CD Settings -> Widgets
- Altering CD widgets erases WP widgets and vice versa
1.6.2
- Small bug with widgets on initial install.
1.6.1
- Incorrect upload.
1.6.0
- Added adminmenu customizing functionality under Settings -> Menus.
- Revised widgets area to properly use the WP Widget API.
- Made core much more extensible.
- Created Widgets, Menus, and Settings API for Client Dash.
- Other bug fixes and improvements.
1.5.5
- Fixed PHP notice error.
1.5.4
- Minor improvement in backend Roles functionality (allows compatibility with new WooCommerce extension).
1.5.3
- Multiple content sections in the same tab were not working.
1.5.2
- Postboxes being half width was targeting all pages, when it should have only been targeting the dashboard.
1.5.1
- PHP backwards compatibility issue.
- Check if class does not exist for Dash Widgets.
1.5
- Added dashboard widget customization.
- Added Settings -> Widgets for dashboard widget customization.
- Added defaults to Roles settings.
- Reversed checkbox logic for Roles settings.
- Added ability to strip out any dashboard widget settings that may be set.
- Added cd-tips, which are handy tooltips.
- Added toggle switches for disabling entire pages within the Roles settings.
- Renamed “Roles” tab in “Settings” to “Display”.
- Changed content “block” system to a content “section” system and separated them out with menus under the tabs.
- Improved some setting visuals.
1.4
- Added Roles customization settings.
- Overall cleanup of plugin visuals.
- Added some new nags for specific users.
- Added new “content section” system for added customization.
- Added references to three exciting new extensions on the addons tab.
- Created new Domain tab on Help page.
- Added support for custom post types in lists on Reports – >Site.
- Added link to view current role capabilities on Account – >About You.
- Created some handy CSS classes.
1.3.2
- Fixed php error on settings page for widgets.
- Added
.cd-col-twoCSS class for two column layouts.
1.3.1
- Fixed save button issue on Icons page.
- Added install/activate/deactivate button on addons page.
1.3
- Added Dashicons customization in Settings.
- Added Addons page for browsing available addons.
- Added alert for empty Webmaster tab.
- Added ability to change number of feed entries pulled.
- Added webmaster dashboard widget.
- Re-worded media-library size under reports.
- Added error catching for feeds.
- Added current user URL to Account- >About.
- Now displays help dropdown for user role to output capabilities on Account- >About.
- Added filter to hide submit button when desired.
- Added conditionals for displaying account information on About tab of Account.
1.2.2
- Changed
get_current_theme()towp_get_theme()since the former is deprecated (thanks to @sethalling). - Modified method for getting role name (thanks @sethalling).
- Added
cd_(WIDGET NAME)_widgetfilter on contents of current dashboard widgets.
1.2.1
- Fixed php warning.
- Safeguarded include_once occurrences for potential issues.
- Reformatted code.
- Added missing files causing fatal error.
- Fixed dashboard widget broken links.
- Re-ordered dashboard widgets.
- Re-ordered menu items.
- Added conditional to only show sites tab under account if is a multisite.
- Removed Webmaster functionality (will be in future release).
- Corrected link for Reports dashboard widget
1.2
- Enqueued
cd.main.jswithupdownfunction. - Added
cd-clickclass toclient-dash.cssforcursor: pointer. - Rearranged information on Site tab on Reports page to be more clear.
- Added a few pieces of data to Site tab on Reports page.
- Removed placeholder content from FAQ tab.
- Allow extensions to add tabs to specific pages.
- Increase extensibility of settings page.
- Added “Webmaster” tab to the settings page.
- Allow user to disable/enable webmaster page.
- Allow user to rename webmaster page/menu-item.
- Allow user to add custom html content to a custom tab on webmaster page.
1.1.2
- Patch to fix potential fatal error when running on older versions of PHP.
1.1.1
- Fixed fatal error problem.
1.1
- Added options page under “Settings->Client Dash”.
- Added ability to selectively display dashboard widgets that are automatically removed on options page.
- Removal of dashboard widgets now dynamic, so only Client Dash widgets will exist.
- Removed “Screen Options” and “Help” from dashboard.
- Removed dashboard widgets from bbPress and Woocommerce
1.0
- Initial release.
- Includes Help page with an Info tab.
- Includes Account page with About and Sites tabs.
- Includes Reports page with Site Overview tab.
- Removes default WordPress dashboard widgets.
- Removes WP logo and menu from toolbar.
- Adds dashboard widgets for each new submenu page.